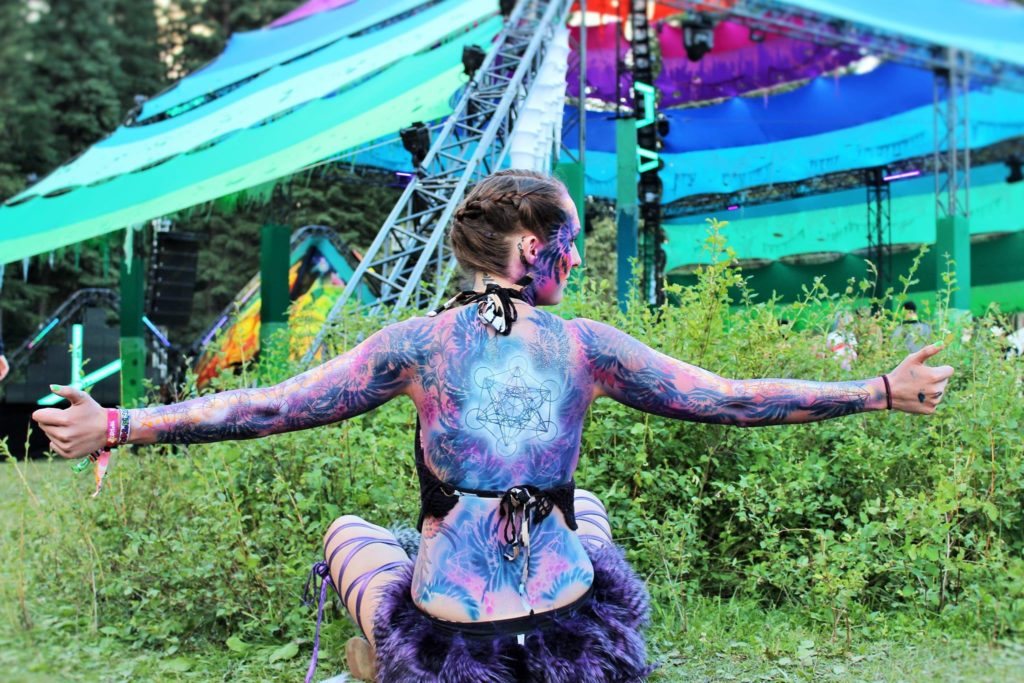
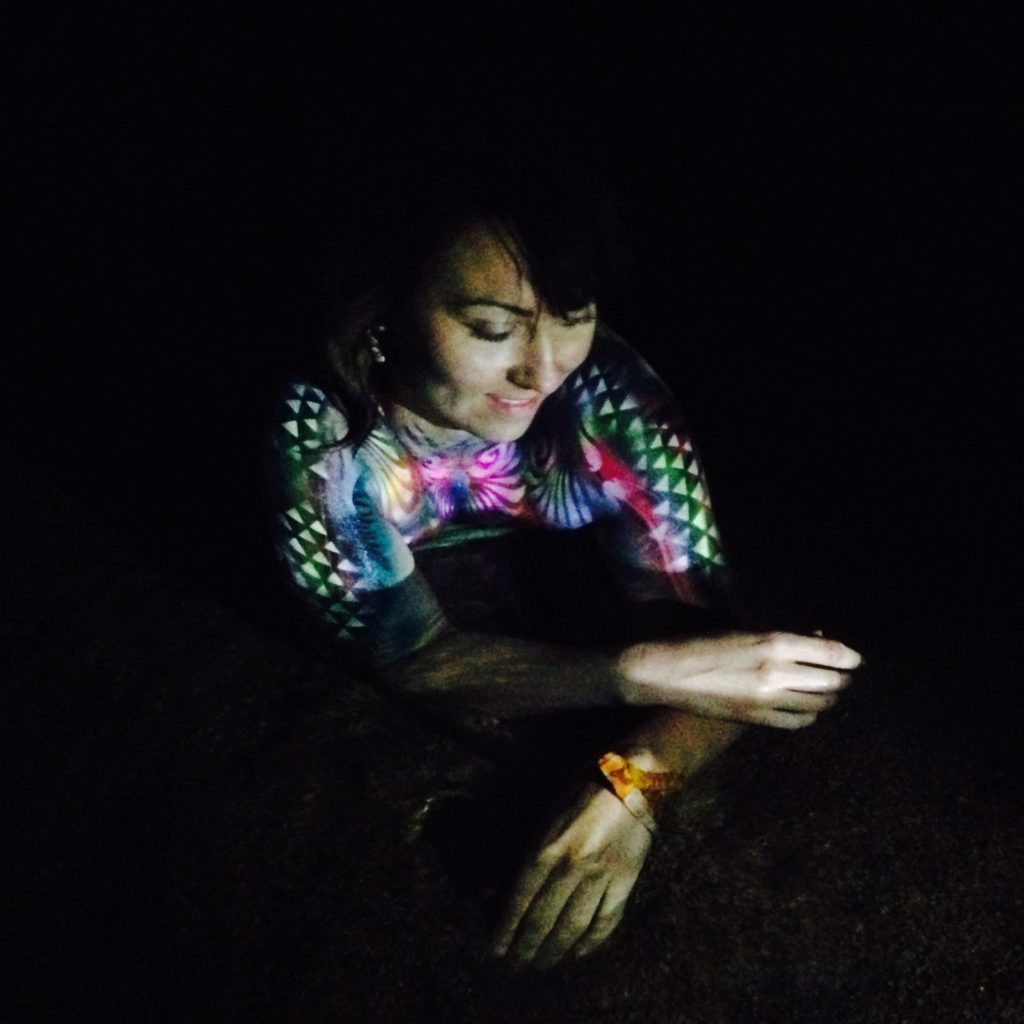
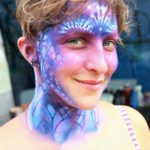
Have you ever seen amazing artwork painted on people’s bodies and thought to yourself, “That looks so cool, I wish I could do that”. Well I have great news for you because the truth is that airbrush body painting is indeed very cool, very fun, and it is very easy to get into.
As a professional body painter that has been painting at bars, clubs, festivals and other events for over 7 years, I can confidently tell you that you can learn to do this amazing art form even if you don’t have prior artistic experience.
I will show you how you can start airbrush body painting right now in the cheapest and easiest way possible.
Airbrush Body Painting Equipment
The first thing you will need to start airbrush body painting is the right gear. Do not be intimidated by this step, airbrushing has a simple setup of only three components:
- The Airbrush
- The Hose
- The Compressor
That’s it. I want to reassure you that it really is that simple so don’t feel overwhelmed when you sift through the ocean of airbrush products out there. Don’t be intimidated by massive starter kits. All you need to know is the basics of these three components so you know what to get.
The Airbrush
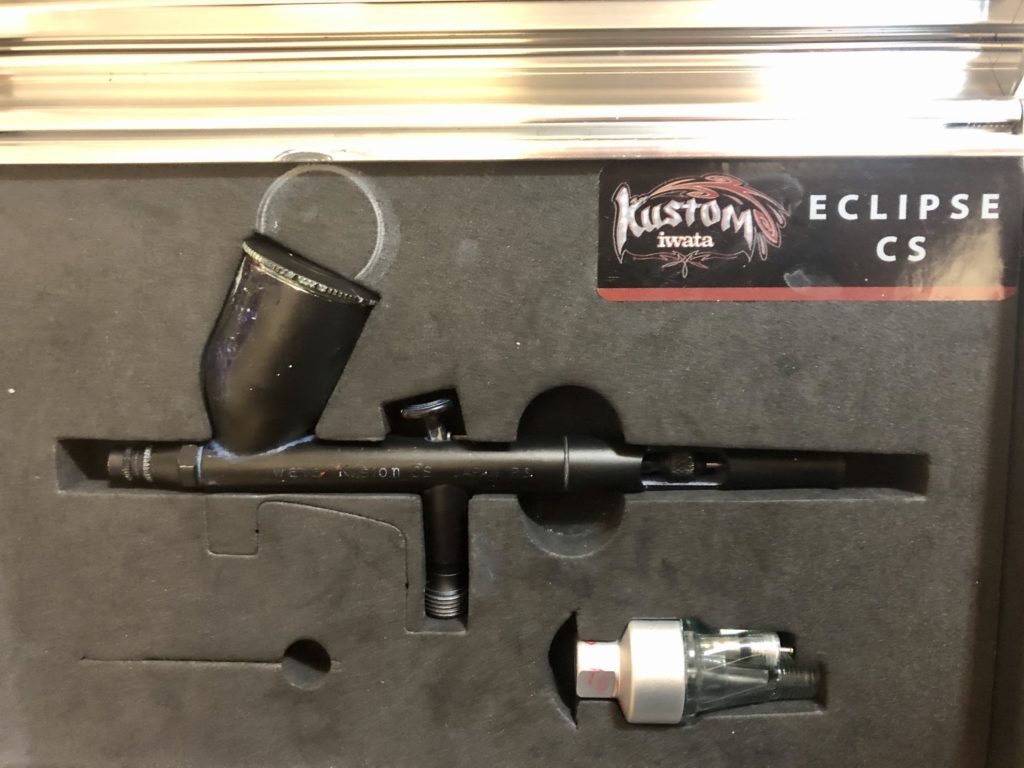
Picking your first airbrush is important; it is the most complex moving part of your setup. Your artwork is only as good as your airbrush is operating so this is the one piece of equipment that I DO NOT recommend skimping on. Get something that is reliable, versatile, sturdy, tried and true, and is from a reputable company with good customer support.
I recommend getting an Iwata Eclipse HP CS. This is the workhorse of the airbrushing world. It’s the brush that I have used since the beginning and it has done everything that I have asked of it. It works on big and small projects, it draws tiny detailed lines just as well as large sweeping shades.
This brush is also sturdy as all hell. I’ve taken it to loud grimy clubs and muddy backwoods festivals alike. I’ve painted upwards of 100 people a day and the Iwata Eclipse refuses to quit. It’s easy to take apart and clean in-field and you can swap out parts without breaking stride.
I’m not saying that other reputable airbrushes aren’t also good in their own right. But from my experience, the eclipse does everything those other airbrushes do except better. To make an easy decision on your first airbrush, I recommend getting the Iwata Eclipse HP CS and being done with it.
Difference between single action and double action airbrushes
If you start shopping around for airbrushes, you’ll likely come across both single action and double action. Double action is what you want.
Basically, the double action airbrush gives you control over both the air output, and the stream of paint. This gives you precise control over the size of the spray pattern, the boldness of your shade, and the taper of your brush strokes.
The single action only has one control input — air or no air. Therefore, single action airbrushes have very limited utility compared to double action. The Iwata Eclipse HP – CS is a double action airbrush.
Difference between siphon feed and gravity feed
You will also find another distinction in airbrush types — siphon feed and gravity feed. I recommend getting a gravity fed airbrush.
Siphon feeds have a little bottle attached to the underside of the airbrush. Gravity feeds have a paint hopper on the top. Siphon feed airbrush setups typically involve several airbrushes dedicated to each color. These are very popular for the small airbrush tattoo style of body art, as they allow you to switch between colors quickly without having to clean out the previous color.
The main problem with siphon feed setups is that it is hard to switch between colors on each individual airbrush. That means that you need to have a separate airbrush and hose dedicated to each color in your palette.
One trusty gravity fed airbrush like the Iwata Eclipse HP CS can switch between endless colors and only requires one dedicated line and hose. They also have the added benefit of mixing colors directly in the hopper for different color shades, something the siphon feeds can not do.
Airbrush Hose
The airbrush hose needs to have a specific airbrush fitting and a quarter inch compressor fitting. I recommend getting the braided nylon hose rather than a plastic one as I find it tangles less and is less prone to damage from kinks.
For body painting, consider getting a hose that’s 10 feet or longer so that you can walk around your model without running out of slack.
Airbrush Compressor
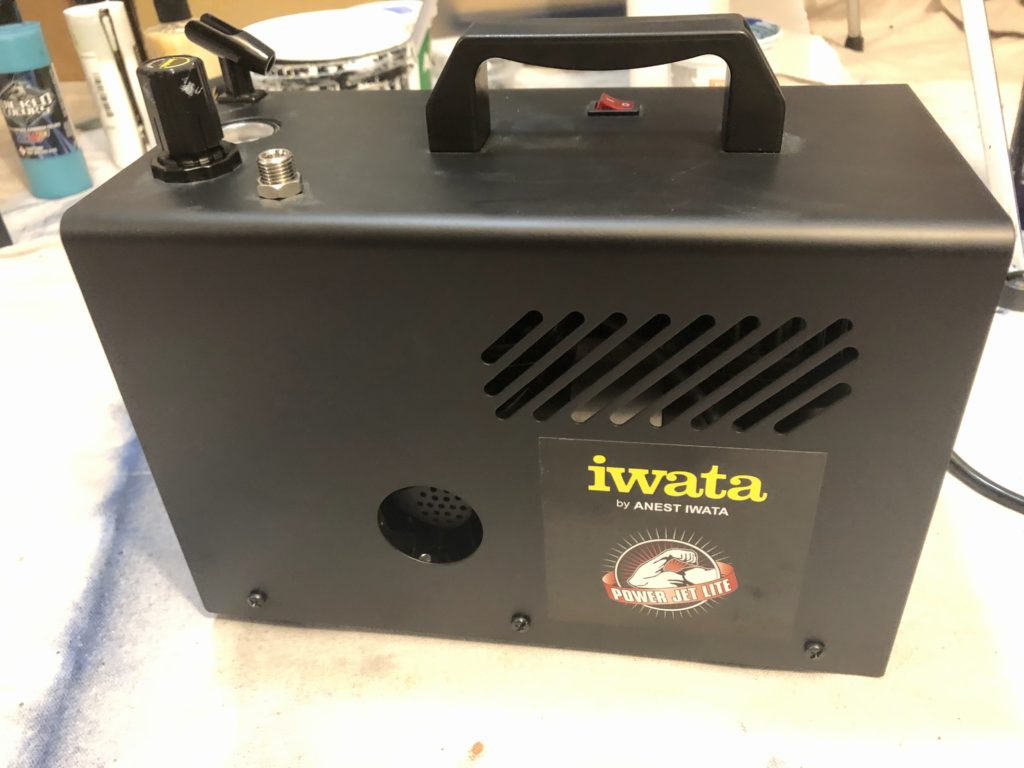
This is one of the main areas where you can save some money and get into airbrush body painting for cheap. There are three things that you need in a compressor to do airbrush body painting:
- Enough working PSI to cover lots of area with your paint
- A sturdy enough motor and holding tank to prevent overheating
- A regulator to give you precise control over the airflow to the gun
The working PSI element is important here so I want to take a second to cover it in depth.
When you’re doing small, intricate designs or lightly shading a canvas, 20 – 40 PSI will be plenty. That’s why when you’re looking for compressors sold as “airbrush compressors”, they generally operate in this range.
When you’re body painting, you will need a wider range of air pressure of up to 60 – 70 PSI depending on your usage. For example, if you were painting a full human adult body, at 40 PSI, it would take you about half an hour to get the first layer of paint down, and it would be very challenging to keep the shading even.
Additionally, many of the “airbrush compressors” on the market do not have holding tanks. This means that the motor switches on when the airbrush delivers air, and turns off when it doesn’t. So if you are blowing air for 30 mins straight, the motor will also be running for that period. This leads to overheating and damage to your compressor.
Some “airbrush compressors’ have an auto shutoff when they begin overheating which is great for preserving the motor life, but not great for when you have a lineup of people waiting to get body painted.
Some “airbrush compressors” out there do have holding tanks and working PSI of up to 70 PSI such as the Iwata-Medea Studio Series Power Jet Pro Double Piston Air Compressor. This is a great airbrush compressor, if you can afford it, I would definitely recommend getting this model.
A quality airbrush compressor for less money
If you’re a beginner and cheap (like I was), let me suggest getting something like this:
6 Gal. 150 PSI Portable Electric Pancake Air Compressor
It has up to 150 PSI, has a 6 gallon holding tank, its built like a brick shit house, it won’t break down after hours and hours of pumping air, and it has a regulator valve. This thing has everything you need in an airbrush compressor and more. The best part of it is that it’s under $100.
The only downside is that this compressor is loud. If you’re doing relaxing miniature model painting at home, I recommend going with a quieter alternative. However, if you’re body painting at a club or festival, the music easily drowns out the hum of the compressor and you can have confidence in knowing that your airbrush will be graced with high PSI goodness all night long.
Now you should have your three main components of your airbrush body painting kit — the airbrush, the hose, and the compressor. But any great airbrush body painting kit needs something to spray.
Airbrush Body Paint
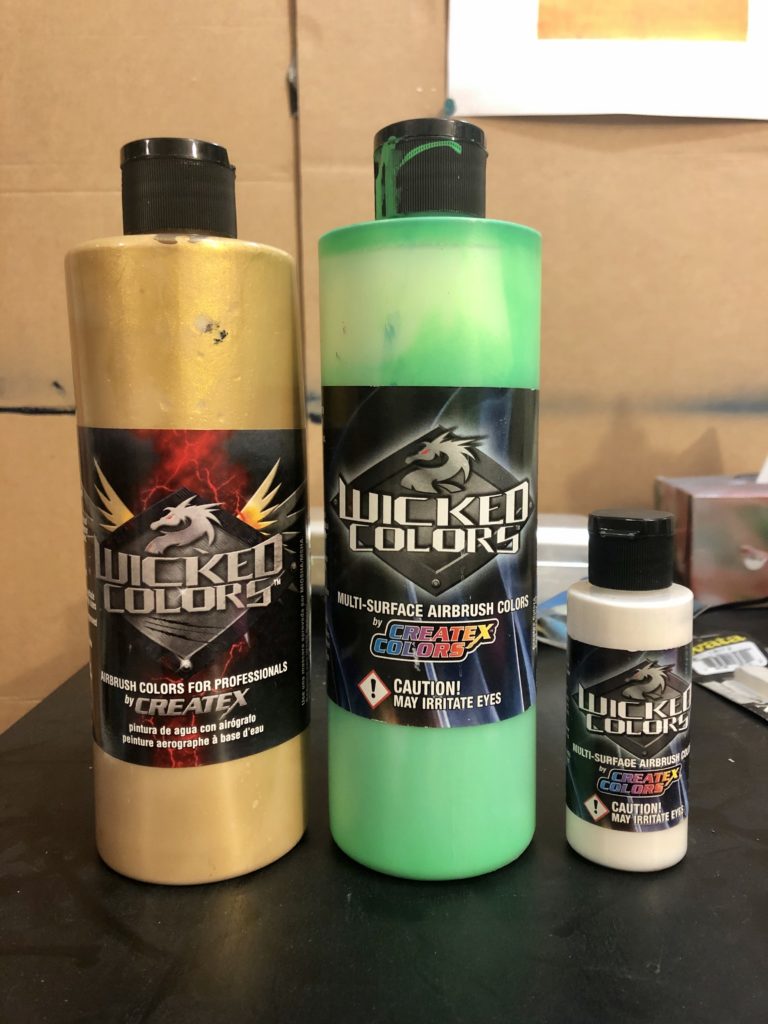
Airbrush paint is special. It has very fine pigments so that it can atomize and spray out of the tiny nozzle. This means that some random acrylic paints you found in your grandma’s old craft drawer ain’t going to cut it.
Yes, not even if you dilute it with water to the perfect consistency (I know from experience).
The three things you need for great airbrush body paint are:
- It has to be airbrush grade with fine pigments
- It has to stay on people’s skin long enough to take pictures and party for the night, but still come off easily in the shower
- It has to be non – toxic
Point number three rules out anything polyurethane based.
You could get alcohol based paints. These are typically made for body paint tattoos that stay on for about a week. The only problems are that they have a complex application process and they are very hard to layer on the skin.
This is why I use water based acrylic airbrush paints. They’re non-toxic, they blend well, and with the right brand, it flows out of your airbrush like soft serve ice cream on a hot July afternoon.
What’s the right brand?
This line of airbrush paint has a diverse color selection, it comes in large quantities for relatively cheap, and it’s non toxic. It stays on peoples skin about a day and a half through sweat, dirt, and dancing; it even stays on when you’re swimming. But it also peels off as soon as you add soap and scrubbing.
I couldn’t come up with a more perfect body paint if I tried!
How much airbrush paint to get
With one 2 ounce bottle, you could probably cover two people from head to toe with a base layer of paint. So those little bottles go fast and become expensive with high paint output.
16 ounce bottles are cheaper per ounce of paint. That’s why I tend to get 16 ounce bottles for the really important colors like primaries, black and white, or fluorescent colors for raves.
For less used colors like silver or transparent brown, you can probably get away with buying 2 ounce bottles.
The two colors that are absolutely essential are black and white. They’re the colors you generally use to highlight, outline and add contrast.
Great! Now you have your airbrush body painting equipment and an assortment of paint. Before you get out there, there are just a few more items you will need to make this the process work seamlessly.
Airbrush Body Painting Supplies
Stencils
The fastest and easiest way to airbrush body paint is to use stencils as your primary design application method. Stencils allow you to use the edges to carve out patterns, texture large areas, and layer the paint quickly and effectively. As you start airbrush body painting more and developing your own style, you will want to start building up a collection of stencils.
In the early days, I used frisket film to coat a piece of paper on both sides. Then I would carve out designs with an exacto knife. This is the cheapest but most time consuming way of making airbrushing stencils.
You could also buy premade stencils. The premade stencils are usually very well made and I like to include a series of versatile premades in my stencil collection. The downside to premade stencils is the cost (and lack of individuality if you care about that).
The third stencil option is to get a vinyl cutter and make your own stencils electronically. This is now my primary method of building stencils. It takes 1/10th the time of hand cutting and it is a thousand times more precise than hand cutting.
Once you start making digital stencils, you open up a whole new world of design. This option has the highest initial investment, but will pay off in the long term and will save your wrists from hours of arduous work cutting these things out by hand.
Water bucket
Take a sturdy old ice cream container something like this:
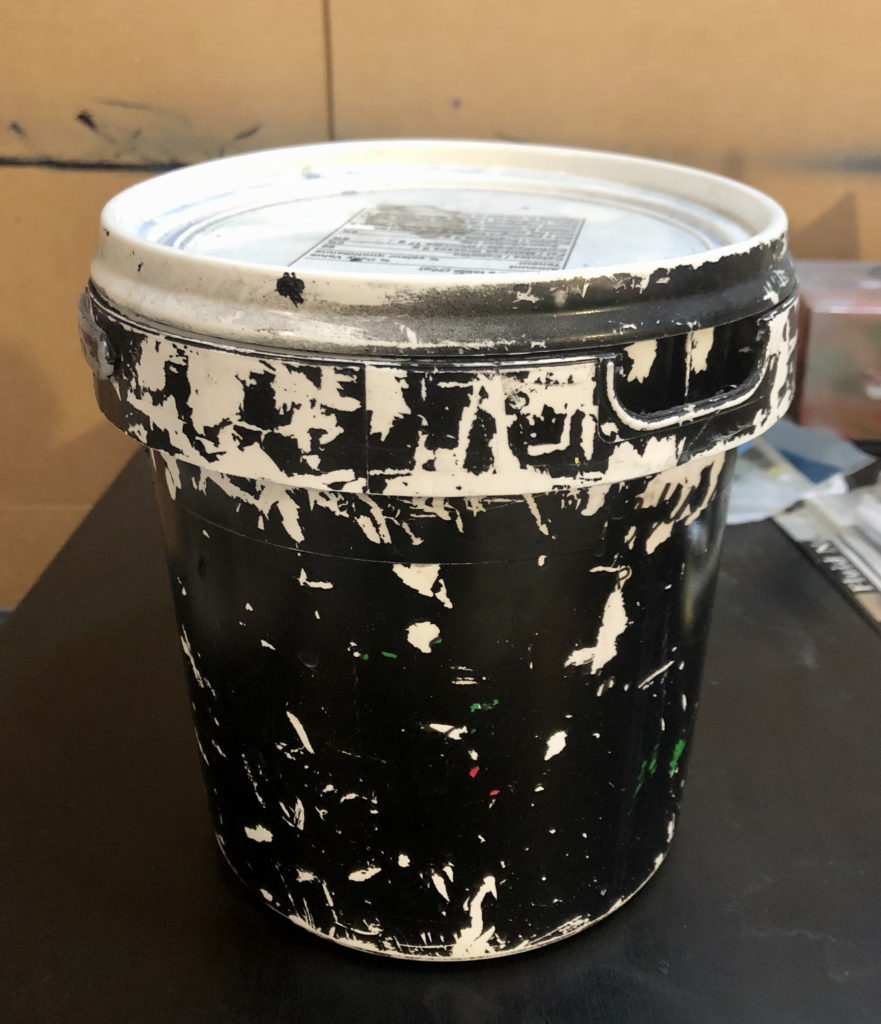
The water bucket acts as a cleaning station for your gun. It also doubles as an airbrush holder.
Airbrush Cleaner
Airbrush cleaner helps to clean out your gun in between colors. It also helps dissolve little bits of dried paint that tend to clog the airbrush. I like to give my airbrush a good clean using some airbrush cleaner once after painting five or so customers.
Toothpicks
Toothpicks are great to clean dry paint out of your gun in the field. They’re hard and pointy so they can get into the nooks and crannies of your gun. But they’re also soft enough to not scratch the metal. Tiny scratches on your airbrush promote fast buildup of dry paint so they should be avoided at all costs. Be nice to your airbrush!
Wiping Rag
Grab a bunch of old shirts or rags to wipe out your hopper when switching between colors. Water and airbrush cleaner dissolves the paint, but the rag helps wipe out the last bits of pigment without contaminating the next color. Rags are also a life saver when the paint is flying and you need to quickly clean up a mess in the chaos.
Drop Cloth
A painting drop cloth is not essential, but it is still a good idea. For indoor jobs, I use a large mesh drop cloth and duct tape it to the floor. If you’re outdoors, don’t bother with the drop cloth and just let the paint hit the ground.
Start today and Have Fun!

There you have it, the cheapest and easiest way to get into this amazingly fun art form. Whether you’re a seasoned artist looking for a new medium of expression or a complete beginner with no previous art experience, start airbrush body painting today.
Hopefully, I’ve given you a helpful look into the world of body painting. With the knowledge to do this, I really urge you to take action. Do not be overwhelmed or procrastinate on starting. I was a complete beginner when I started, I got the equipment I needed in one afternoon, and I covered the costs of the equipment and paint that night at the bar. Seven years later, my artwork is now a million times better and I’m having more fun than ever.
This is a great way to get people to light up and to help them have an amazing time. If I can do it, so can you, so get out there!
Good article!
Thanks man!