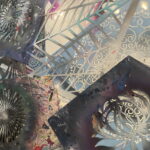
So you want to customize your brand new kicks? Airbrushing is a very effective way to paint the exact design you want and make your shoes look fresh and fun.
But before you start letting the paint fly, you’re going to want to make sure that you have the right airbrush for the job.
As someone that has been airbrushing for many years, I’d like to share my perspective on what the best airbrush for shoes is and give you some insight on how to pull off great airbrush shoe art that looks professional.
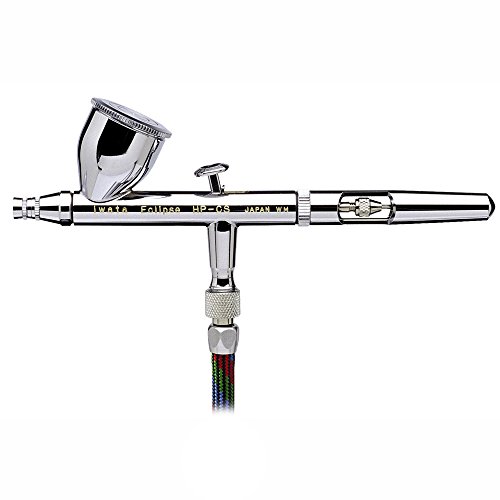
The best airbrush for shoes is the Iwata Eclipse HP – CS. This airbrush has a .30 mm nozzle, a double action trigger, and a gravity fed hopper. This configuration is perfect for airbrushing shoes because it gives you maximum control over paint flow, has an ideal spray pattern, and allows you to mix paint directly in the hopper.
As it turns out, the process for airbrushing shoes is much like airbrushing other kinds of substrates. However, it helps to know what you’re doing before you get started so you don’t make mistakes, slow down your workflow, and potentially wreck your brand new sneakers.

What do I need to airbrush shoes
To airbrush shoes, you’re going to need a few things that will make the process easy and allow you to focus on the artwork:
- An airbrush setup
- Airbrush paint for shoes (textile paint)
- Clear Coat protectant
- Masking tape
Airbrush setup for shoes
This is going to be the same setup for any other kind of airbrush application. If you’re already into airbrushing, chances are that you already have the equipment. That’s great – you can get started on your shoe project right away!
If you’re new to airbrushing, you’re going to need the basic parts of an airbrush setup – the airbrush, the hose, and the compressor. There are tons of great beginner kits out there that include all this equipment in a neat package.
I recommend getting the Master Airbrush Cool Runner II Delux Airbrush Kit for airbrush shoes. This kit comes with all the required equipment and a diverse colorset of airbrush paints that work well on shoes.
If you want to get an airbrush separately, I can’t recommend the Iwata Eclipse HP- CS enough. This airbrush is a perfect multipurpose tool that can pull off sweeping fade patterns and tiny detail work. It can handle the kind of textile airbrush paint that you will need for shoes which makes it a perfect option for your project.
Airbrush paint for shoes (textile paint)
To make your airbrush art stay fresh and not fade, you’re going to need paint that binds well with textile substrates. A great option for textile paint is Createx Airbrush Paint. This is a water based acrylic paint that has great color options, it’s easy to work with, and also binds well to fabrics.
Clear coat protectant
Even with great textile paint that binds to the shoe well, it’s a good idea to apply a clear coat on top to make sure that the paint is protected. Applying clear coats is a standard practice for many different airbrush applications because it keeps the design fresh and vibrant through all conditions.
I recommend getting the Createx Matte Top Coat for airbrushing shoes. It applies a thin transparent coat that maintains the airbrush design. If you want a glossy look to your finished product, you could also go with the Createx Gloss Top Coat. Personally, I prefer the matte finish look. But if you’re into the glossy finish, go for it!
Masking tape
Masking tape is an airbrusher’s best friend for many many different applications. Make sure you have a nice big roll of masking tape before getting into your shoe project. There’s nothing worse than having over spray get through where you don’t want it because you didn’t mask well enough.
Best airbrush compressor for shoes
When you’re airbrushing shoes, you want to have an air compressor that has enough air pressure for large shading patterns, but it also has low-psi capabilities – this will give you versatility in what kind of designs you can paint.
The best airbrush compressor for shoes is the Paasche Airbrush D3000R 1/5 HP Compressor. This airbrush compressor has an optimal level of airflow in the 10 – 40 PSI output range. It has a precise air regulation valve for finely-tuning your detail work, and a holding tank to prevent overheating.
If you already have an airbrush for shoes, and you just need an accompanying compressor, get this compressor – it has everything you need for airbrushing shoes and home projects of all kinds.
Note: In another post about airbrush body painting, I explained how you can just use a normal tire/shop compressor for airbrushing. So if you already have one, you’re on a budget, and you don’t mind the noise level, don’t bother getting a fancy airbrush compressor just for this job. Airbrush specific compressors are nice if you’re doing lots of airbrushing, but not necessary for a one-and-done job.
How to airbrush shoes
Airbrushing shoes is a straight-forward process:
- Clean and remove laces
- Apply masking tape
- Apply deadly airbrush design
- Apply clear coat
- Remove masking tape and touch up
Clean shoes and remove laces
Prepare your shoes for the incoming masterpiece you’re about to create. Just use water and light soap to remove any dusty patches or scuffs. If the shoes are brand new, no need to do additionally cleaning.
Remove the laces before painting so that you don’t get any overspray on them.
Apply masking tape
Masking tape will be your best friend when you’re airbrushing shoes. Wrap the masking tape around the sole and any other rubber sections that you don’t want to get paint on. Make sure that the tape is pressed firmly to the surface so it doesn’t come off mid-painting.
Use an exacto knife to trim excess tape away from the overlap areas. This trimming technique is how you can “cut-out” small corners and get your mask to line-up exactly on the edge of the rubber.
This is a very important step so take your time to get it right. Get good at masking and the world is yours in the realm of airbrushing.
Apply deadly airbrush design
This is your chance to bring out your inner artist and have fun! Apply the design you had in mind using fades, fills, stencil work, or freehand details.
Depending on what kind of fabric your shoes have, you might need to really lay-on the paint. Don’t be afraid to make your layers thick to get the effect you want. In the end, the clear coat will hold it all together so don’t worry about applying excessive paint.
If you’re new to color theory, keep in mind the order in which you apply your paint – always go from the lightest colors to darkest. You should almost always go from light to dark in airbrushing because the light colors won’t show up on top of the dark colors. The exception to this rule would be if you are painting a dark shoe. In which case you could start with an opaque white to outline the designs you want to create (white will show up on top of black.) You can then go in with lighter colors on top of the white designs and build back up to darker colors from there.
It never hurts to practice a little bit on a piece of paper before going in on your shoes. The main thing to remember when you’re airbrushing is to have fun!
Apply clear coat
Fill up your airbrush hopper with the clear coat just like a normal airbrush paint color and turn up the air pressure to 30 – 40 PSI. Apply the clear coat in sweeping thin layers. Try to avoid any globs or buildup. Wait for 2 or 3 minutes while one coat dries, then apply another layer. It usually takes 3 or 4 layers to make a nice protective coating. Whether you chose a nice matte coating or a glossy one, you’ll know when you have enough layers by using the eye test – when it looks great to you, it’s done!
Remove masking tape and touch up
At this point, the shoes are almost done! All that’s left to do is to peel off your masking tape and touch up any areas where paint got through. These areas can be on the eyelet holes for the laces, or small indents around the rubber where over spray seeped in (if you took your time in the masking process, there shouldn’t be much to do here).
Isopropyl alcohol or airbrush cleaner both work good to do touch ups. Take a que tip, dip it in your cleaning agent, and carefully wipe the areas you’d like to clean.
Other than that, all that’s left to do is to lace ’em up, and they’re good to go!
If you follow all the directions in this article, I’m confident that you can pull off a legitimately sick paint job. First, make sure that you get all the right gear – airbrush, hose, compressor, paint, clear coat, and masking tape. Then, follow the five step process in this article to airbrush your shoes something awesome.
If you put in the time and care to do everything right, airbrushing shoes is very much worth the time and effort because they look extremely unique and cool.