When you get into making your own stencils, you inevitably start looking for faster and better ways to cut them out. Over the years, I have experimented with different stencil cutting methods and learned what works and what doesn’t.
While some cutting machines are labelled as “stencil cutters”, others are labelled as “vinyl cutters”. This labeling convention confused me in the past as I’m sure it has many others. So I’d like to clear up the confusion once and for all by answering the relevant question: Can you cut stencils with a vinyl cutter?
Yes, vinyl cutters can be used to cut both reusable and adhesive backed stencils. With a quality vinyl cutter, the proper material, and the right downforce settings, you can make high quality stencils. Use a machine with a digital servo, mylar stencil material, and at least 200 grams of downforce for the best results.
Knowing that most vinyl cutters have the ability to cut stencils is a liberating discovery because it expands your options for getting a cutting machine that can do it all.
Best vinyl cutters to make stencils
Vinyl cutters come in many shapes and sizes. The main thing you want to look out for in your vinyl cutters is that they have enough downforce to cut out your chosen stencil substrate. Make sure that your machine has at least 200 grams of downforce and a cutting thickness of at least 3 mil.
Checkout this list of the best stencil cutters for airbrushing. Every machine on the list has adequate downforce and thickness to cut stencils.
My top recommendation for a beginner vinyl cutter that cuts stencil’s very well is the Silhouette Cameo 4. This machine is made for cutting both vinyl and stencils. It has a maximum downforce of 1000 grams and a maximum cutting thickness of 117 mil. This machine has no problem cutting through whatever stencilling material you choose.
The one thing to keep in mind is that the Silhouette Cameo 4 has a mechanical stepper motor and only 12 inches of cutting space. This creates limitation for the size and precision of your stencil designs.
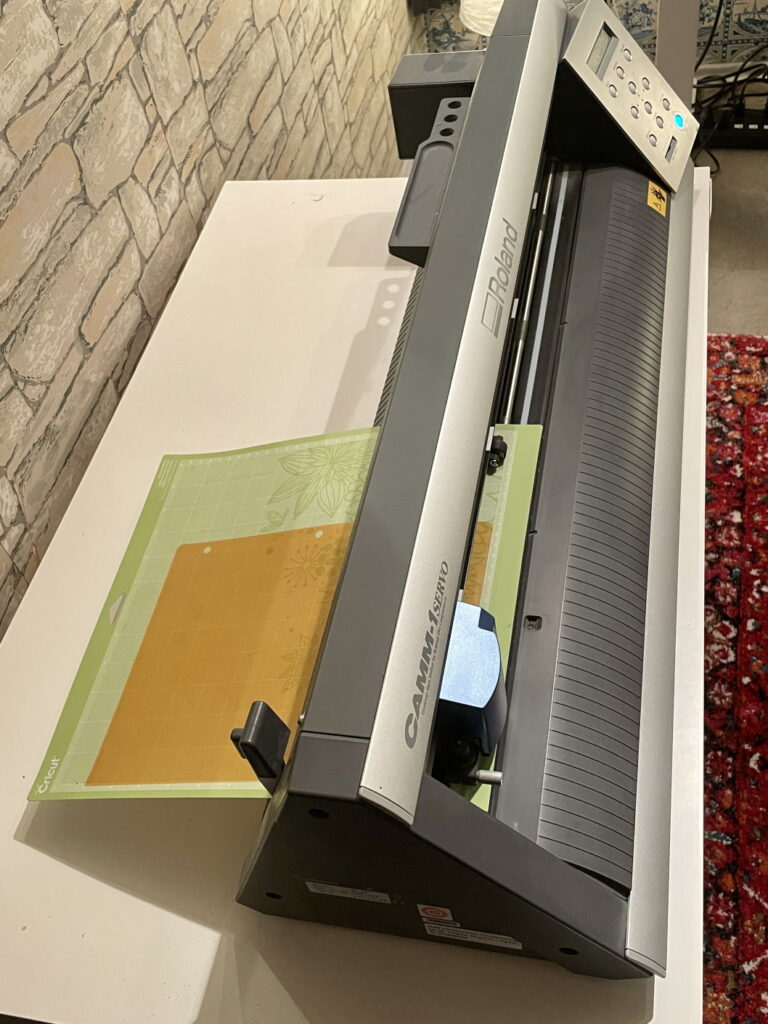
For the advanced stencil cutting enthusiasts, the Roland GS – 24 will suit your needs better. This machine has 24 inches of cutting space and a digital servo motor for the absolute best in precision cuts. The GS – 24 is sold as a vinyl cutter but I have used it to cut hundreds of stencils over the years with amazing results. It produces up to 350 grams of downforce and can cut material up to 39 mil thick. Although this is less than the Cameo 4, it it still more than enough to cut through very thick stencil substrate. It makes up for less cutting downforce with precision and cutting space.
Once you have a vinyl cutting machine that can cut stencils, its time to find the right stencil material.
What material is used for stencils with a vinyl cutter
Vinyl cutters are very capable of cutting out stencils, but you have to pick the right stencil material. If the material is too thick, then even the strongest vinyl cutter in the world won’t be able to cut it.
Check out this article about the best materials for stencil cutting. It covers the best material for reusable stencils, adhesive backed stencils, and handmade stencils.
The best material for reusable stencils on a vinyl cutter is mylar. Mylar is a flexible polyester film that has ideal properties for cutting on a vinyl cutter – its thick enough to hold some rigidity but thin enough to be cut.
Mylar comes in various thicknesses which is usually measured in Mil. Mil means thousands of an inch. So a 1 mm thick piece of plastic comes out to about 39 mil.
I’ve found that mylar about 6 mil is a good thickness for reusable stencils. This is of course up to your personal preference because vinyl cutters have the capability to cut much thicker plastic. With a good vinyl cutter like the Silhouette Cameo 4 , you have the capability to cut mylar up to 117 mil. However, I find that as stencil material gets thicker, it gets less flexible and harder to handle. Not to mention the wear and tear that will result on your cutting blade which will eventually need replacing.
If you stick in the 5 to 15 mil territory, you should have no problem cutting fantastic reusable mylar stencils with your vinyl cutter.
What settings to use for cutting stencils with a vinyl cutter
There’s three settings that you need to keep in mind when cutting stencils with a vinyl cutter:
- Downforce
- Blade Extension
- Cutting Area
The downforce should be set high enough to cut through the stencil substrate but not enough to cut into the cutting mat. I’ve found over the years that this comes out to be about 200 grams. This is a ballpark figure that will depend on how thick your stencil substrate is, the type of vinyl cutter you’re using, and the accompanying blade extension setting.
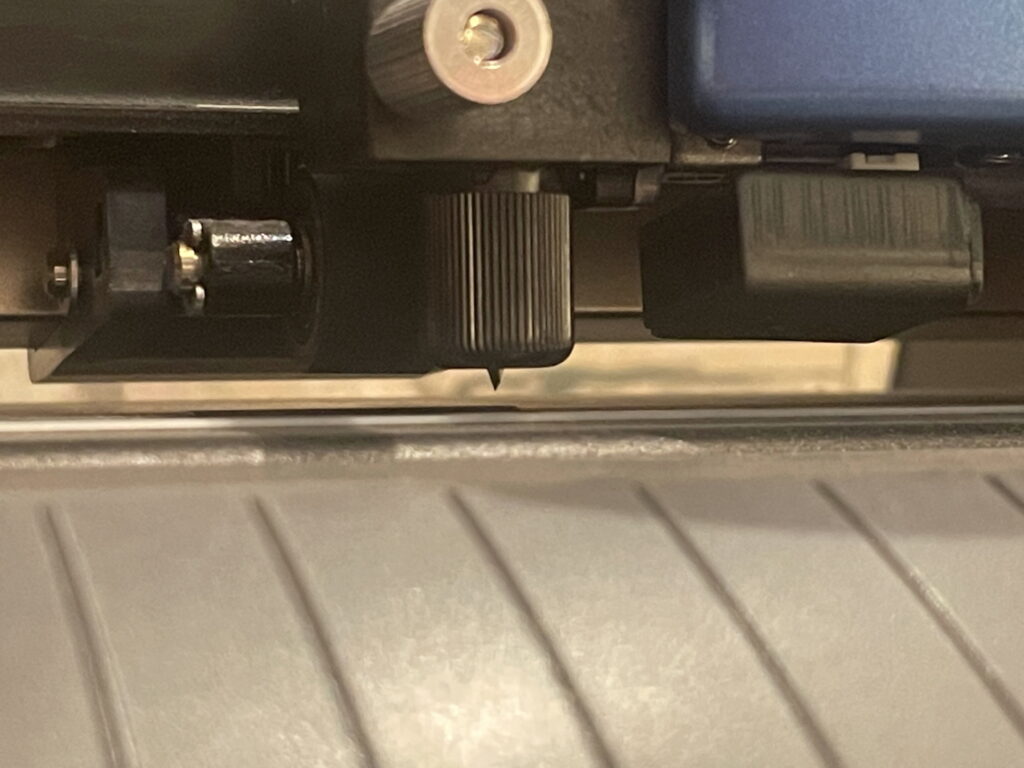
The blade extension is how far the cutting blade is poking out of the holder and how deep it will cut. Only a few millimeters is necessary to get enough extension to cut through most substrates.
The stencil cutting area refers to the size within which the stencil design will be cut. This area can be automatically measured by the vinyl cutting machine or manually inputted. Note: the cutting size will be a reflection of the size of your cutting mat, NOT the size of your design. Make sure that the design fits within the cutting area so that it doesn’t extend over the edge.
How to cut stencils with a vinyl cutter: step by step
Before starting your vinyl cutting project you’ll want to make sure that you have everything that you need:
What you’ll need
- Vinyl Cutter – if you already have a vinyl cutter, great! If not, get the Silhouette Cameo 4, the Roland GS – 24 or get another recommended cutting machine from this list of stencil cutters for airbrushing.
- Stencil Cutting Material – get a package of 6 mil mylar sheets to get started
- Cutting Mat – you’ll need an adhesive mat that can hold the stencil material in place and act as a backing to stop the cutting blade from coming through and damaging the teflon on the machine.
- Computer – any computer that can run your vinyl cutter’s software program. I find that solid state drive (SSD) computers with decent RAM (8GB & up) work well for running vinyl cutting software. Something like the Dell XPS would work perfectly.
Step-by-step process
This instructional is specific to the Roland GS – 24 because that is the vinyl cutter that I use to make stencils. However, the step-by-step process is the same for other kinds of vinyl cutters as well.
Step 1: Install the required software for your vinyl cutter on your computer
The scope of this article is not about how to operate software on vinyl cutters. However, make sure that you read the manual BEFORE plugging in your machine. Sometimes the driver will configure improperly if the installation is not completed in the correct order. Once you have your software installed, its time to put it to work.
Step 2: Build a vector file for the stencil design on your software
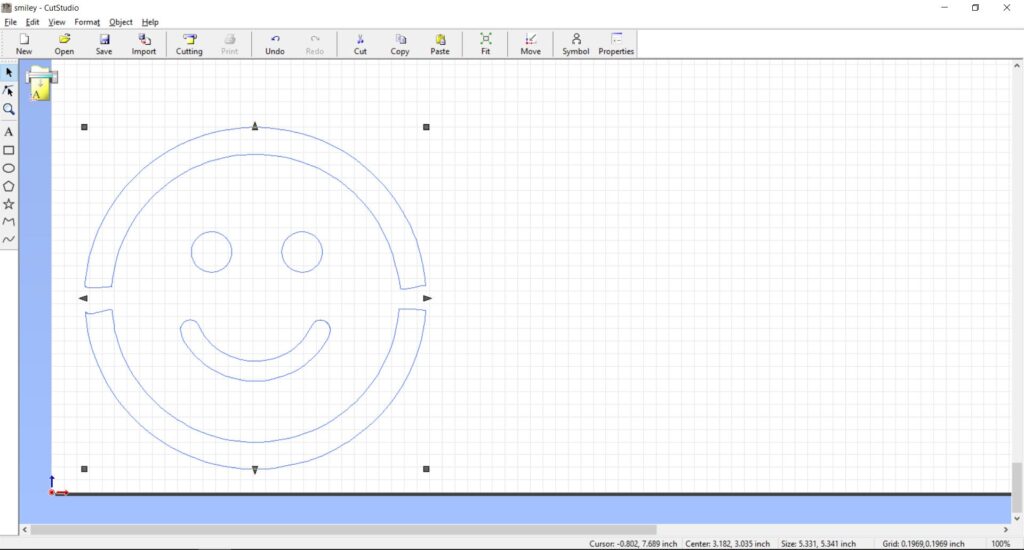
The vector file is what your software program sends to the machine to tell it where to cut. Depending on your software, you have different options for how you make a design. Some software allows you to outline images, draw on a touchscreen, or directly scan a physical design into the software (for example the Brother CM350E ScanNCut 2 has this feature).
Make sure there are no “islands” in your stencil design. Any detached sections of the stencil will just fall through when the finished stencil is cut. For designs that have “islands”, try to connect them to the main stencil with discreet “bridges”. Once you have a vector file that you like, its time to get the machine ready for cutting.
Step 3: Set the downforce, blade extension, and cutting area on your vinyl cutter.

You will have to play around with the downforce and blade extension settings on your cutting machine to set it exactly. I recommend setting the downforce at 200 grams first and working your way up or down from there.
The blade should only be sticking out from the holder by a few millimeters. Only adjust the blade extension to compensate for excessive use of downforce. For example, if you are having to use 500 grams of down pressure to cut through the stencil material, extend the blade and try to get the downforce closer to the 200 grams of down pressure setting.
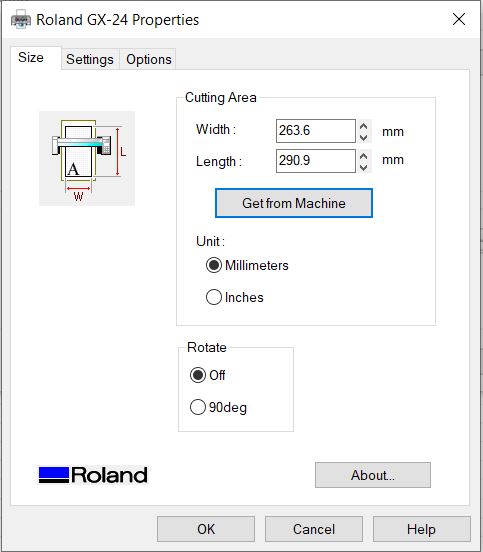
The cutting area can be set by the machine on a GS – 24. Once you load up the cutting mat, go into the cutting machine “properties”, and click on “get from machine”. This will load and set the cutting mat’s dimensions directly onto the vinyl cutting program. Make sure that the dimensions on the machine’s screen match the dimensions on your computer. If your vinyl cutter doesn’t have this feature, measure the dimensions of the stencil material and enter the cutting size manually.
Step 4: Load up your stencil material for cutting on the machine
Take your mylar sheet, put it onto the cutting mat, and feed it into the cutting path on your vinyl cutter. Make sure the mylar is placed in line with the bottom left corner of your cutting mat. Ensure that the vinyl cutter rollers are in the correct position to hold the cutting mat. Once the cutting mat is in position, engage the holding lever to hold the roller in place. Press “Enter” on the vinyl cutter control panel to engage the machine. The rollers will pull the cutting mat into cutting position.
Step 5: Cut a practice strip on your stencil material
Press the “TEST” button on your vinyl cutting machine. This will cut a small circle and a square at the bottom of your mylar sheet. If this test cut goes all the way through the mylar sheet, your cutting settings are set high enough to cut through the material. If it doesn’t cut all the way through, you will have to either increase the downforce setting, increase the blade extension, or both.
Note: you don’t want to set the blade and downforce too high. This will start to wear out your blade and cutting mat. Try to find the perfect setting by cutting multiple test strips until you are applying just enough pressure to cut through the substrate, but not any more. Cutting with the right settings will prolong the life of your cutting blades and vinyl cutter.
Step 6: Initiate cutting process


Click “Cutting” on your computer software and let your vinyl cutter do it’s thing! Once it’s done cutting the design, release the holding lever and carefully slide out the cutting mat. Weed excess cutouts and you’re done!
Vinyl cutters will indeed cut stencils. The best vinyl cutters on the market these days have more than enough downforce and blade extension to cut through stencil material. Take some time to set up your machine and get the settings just right. Experiment with different stencil material as well. Mylar is the most common material for cutting reusable stencils, but other materials might work better for what you’re trying to do.
At the end other day, continued experimentation with your stencil cutting process will get the best results. Afterall, creativity is the name of the game.