Nobody likes getting paint where it’s not supposed to go. A splatter of paint on grandma’s priceless antique collection would be sure to cause some awkward vibes at thanksgiving dinner.
In airbrushing, paint particles are indeed flying through the air at high velocity – a chaotic and messy activity at first glance. But how messy is airbrushing in actuality?
With the proper precautions, airbrushing is not that messy. The biggest risk for making a mess when airbrushing is unprotected overspray. Protect for overspray, ventilate properly, and use only as much air pressure as you need for clean and tidy airbrushing.
This article is all about how to set up your airbrush area to protect against overspray and ensure that you have a clean and tidy airbrushing experience every time.
How to stop overspray when airbrushing

Overspray is the excess spray pattern that doesn’t make it onto your substrate and instead lands on the backdrop or floats around in the room. Overspray can show up as faint lines directly behind your canvas, or as light coloring elsewhere in the room.
In airbrushing, the infamous overspray is a tricky beast to tame.
It’s sneaky.
Just when you thought you had all your bases covered, obnoxious lines somehow still make it onto unwanted places.
The good news is that once you tame the overspray beast, it will never bother you again. The key is to expertly use the tools of minimum needed air pressure, ventilation, masking, and drop clothes.
Using the minimum needed air pressure

The first and most effective way to protect against overspray is to simply avoid creating it – don’t crank up the air pressure to god awful heights.
When you use too much air pressure to atomize paint, excess particles have a hard time binding with the substrate and end up floating around in the air.
This is a sure way to find colored patterns in unexpected places all around your room.
Instead of turning up the air pressure, use just enough to get the job done. You should have good paint flow in a smooth spray pattern – as opposed to a large aggressive spray pattern.
To find the perfect air pressure, consider what kind of substrate you’re painting. If you’re doing small detail work like model paint use a lower air pressure somewhere between 10 and 25 PSI.
For larger fade and fill effects, you’ll need to turn it up a little more – use a higher pressure of between 25 and 50 PSI.
Try to avoid creating big clouds and uncontrollable spray patterns.
To have precise control over your air pressure, you will need to get an airbrush compressor with an air regulator. Something like the Paache D3000R is perfect for beginners because it has a built-in air regulator, it’s quiet, and it has a holding tank.
For more info, checkout this other article for the best air compressors for airbrushing.
Ventilation
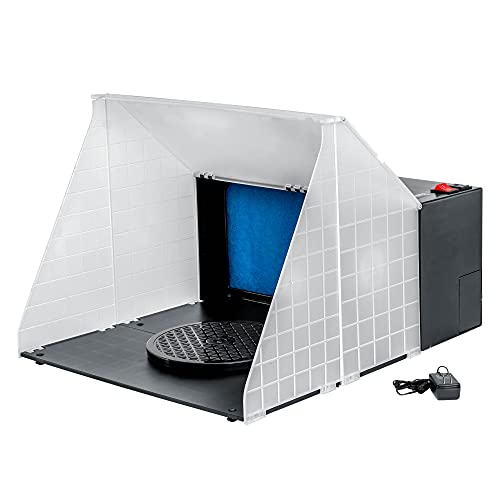
Best Spray Booth for Airbrushing with Vacuum Ventilation
Any good airbrushing area needs proper ventilation. Good airflow does two jobs – keeping atomized particles away from your nostrils, and dispersing overspray.
You can achieve adequate ventilation by simply opening a window, blowing a fan towards it, or getting an actual vacuum system to suck atomized particles away.
For model airbrushers and hobbyists, a spray booth is a great way to set up a ventilated spraying area. The spray booth is built specifically to combat overspray and actually does a great job to ventilate enclosed areas.
Masking
Masking involves using tape to cover areas that you don’t want paint to get onto. This technique is an art in itself as many professional airbrushers use it for creative effect.
The trick to effective masking is to use masking tape generously.
You can get masking tape in many different sizes so there is no excuse for not adequately masking an area thoroughly. You can always use an exacto knife to cut away excess.
Drop cloth
A drop cloth is a great fail safe for overspray that manages to get through your other defenses.
I always throw down a drop cloth when I’m airbrushing for the piece of mind that it gives me from not only overspray protection but also accidental spills.
I recommend getting a large drop cloth even if you don’t have a large work area. You can always fold it to fit and then you can even tape it on the walls as a backdrop.
Airbrushing Inside vs. Outside
Airbrushing can definitely work both indoors and outdoors. Over my years of professional airbrushing experience, I’ve worked in both environments with great results.
Which environment works better essentially comes down to this:
Indoor airbrushing provides a controlled environment that is superior for small detail oriented work. However, for large, messy jobs that produce tons of overspray, an outdoor setup is the way to go.
The major variable in an outdoor setup is the wind.
A slight wind will not affect your airbrush’s operation. However, large gusts will start to blow the atomized paint stream and affect the spray pattern. When the wind gets to this point, your airbrush stencils and other equipment will probably start blowing around and making a mess.
At this point the juice isn’t worth the squeeze and it’s time to pack up and bring it indoors.
Indoor Airbrushing Setup
PROS
- Total control of the environment
- Protection from wind and rain
- Permanent setup – no take down time required
CONS
- Need for ventilation
- Need for more overspray protection
- Not as much space to move around
- Lower PSI applications only
Outdoor Airbrushing Setup
PROS
- Space to move around and let the paint fly
- Don’t have to worry about getting messy
- Enjoy the outdoors and get fresh air
CONS
- Weather dependent
- Wind can blow airbrushing setup around
- Less precise detail work
- Non-permanent setup – take down time required
Most airbrushers have a designated airbrush setup indoors – a spot to just sit down and get some good airbrush work done.
But on a nice day, take your airbrush gear outside, turn up the air pressure and let the paint fly. It’s a freeing feeling to not worry about the mess!
How to airbrush in an apartment
Many people have great apartment airbrush setups. An apartment setup will be mostly the same as a house setup with proper ventilation and overspray protection. However, you will also need to consider the noise level.
Most airbrush air compressors are fairly quiet and will not be a nuisance to the neighbors. But keep in mind that higher powered air compressors generally produce more sound.
If you’re only airbrushing models, figurines, or fishing lures a small 10 – 25 PSI air compressor is all you need. Noise is not really a concern for small air compressors so you have many options to choose from for low PSI applications.
Finding an air compressor that pumps out enough pressure AND is quiet enough for apartment airbrushing is a little more difficult. If this is what you need, I recommend getting the Iwata Studio Series Power Jet Pro.
The Power Jet Pro pumps out up to 70 PSI with no issue and all the while keeping noise levels to a low pur.
Do you need a mask/respirator for airbrushing?
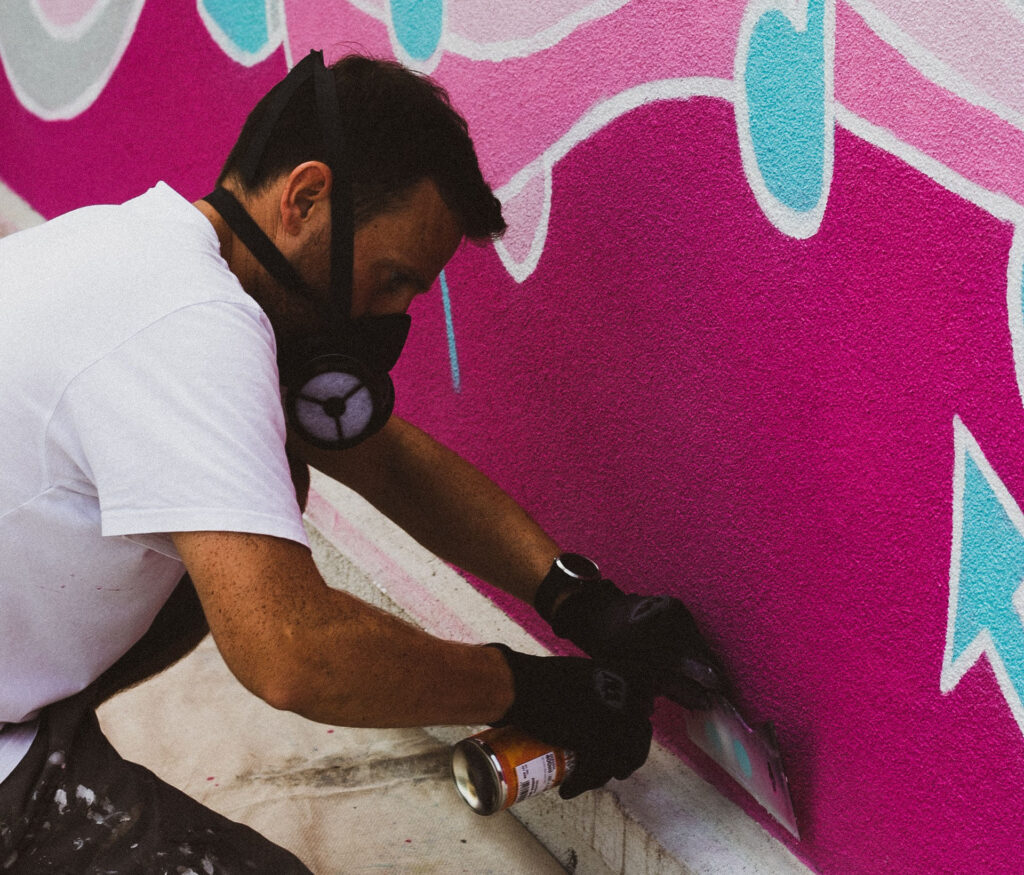
Airbrushing involves atomizing particles of paint. That means that whatever kind of paint you put into your airbrush will be floating around in the air in the form of tiny droplets.
Non-toxic particles from paints like water-based acrylics are relatively harmless unless a thick cloud forms and they become overwhelming.
Toxic paints like urethane based are extremely dangerous to your health when atomized.
A good rule of thumb for airbrushing is to always have good ventilation AND wear a respirator when you’re using toxic paint.
The difference between a mask and a respirator
Respirators are made for protecting you against the inhalation of airborne particles.
Masks are made for protecting others around you from your coughing, breathing, and sneezing.
This means that a respirator is truly the only sure way to protect yourself against toxic airborne paint particles.
Best practice is to wear a P- Rated respirator when airbrushing with toxic chemicals like urethane and polyurethane based paints. The P rating means that the National Institute of Occupational Safety and Health (NIOSH) certifies the respirator “oil-proof” – providing the highest level of air-filtering possible.
This 3M respirator is perfect for airbrushing toxic paints – it’s comfortable, unobtrusive, and compatible with the P-100 cartridges that are required.
For more information about respirators for airbrushing check out this article:
ARTICLE: Masks for Airbrushing | How to tell if You Need One
Airbrushing can be messy if you don’t take the proper precautions. But with some thought and care put into your airbrushing setup, you can airbrush mess free, even in a small apartment!
Use the minimum needed air pressure, set up proper ventilation, get good at masking, and use a drop cloth to have a clean and tidy airbrushing session every time.